829B foot valve problem (part 193)

  • I have a Petromax 829B 500HK Bundeswehr made in 1962.


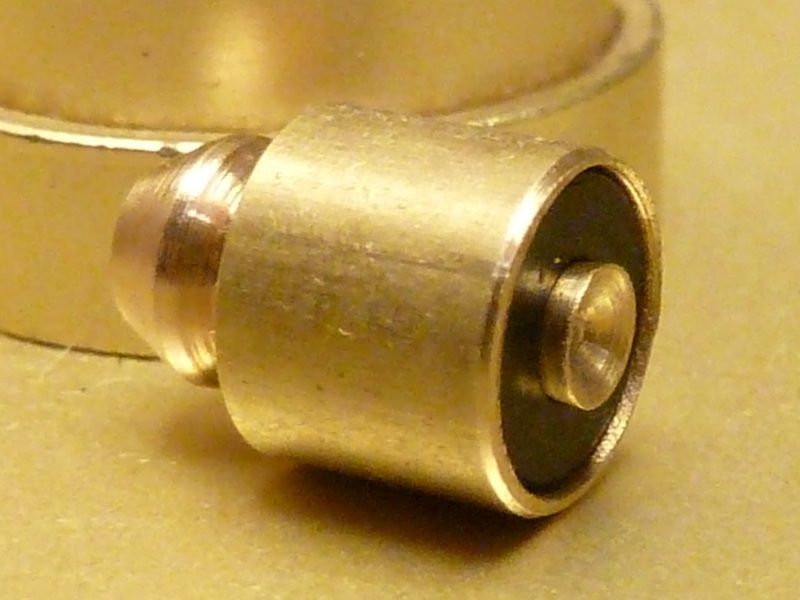
    Today I had the lamp apart because the lead washer (part 90) between the vapouriser and the tank was leaking. I thought that it would make sense to replace part 193, Vapouriser washer whilst I had the lamp apart.


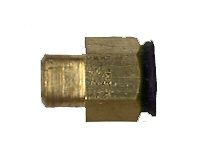
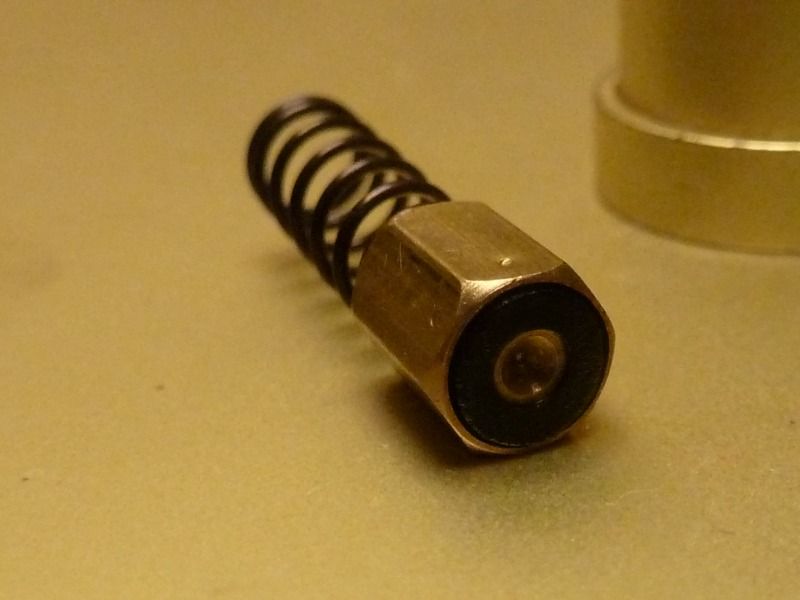
    The new part 193 is not exactly the same as the old one. The old part is hexagonal and the spring fits inside it. The new part is round and the spring fits onto it.


    I fitted the new part but found that the valve leaks very badly and will not close. The problem is that the new part 193 has a hollowed out, conical brass section in the centre but this is slightly raised up above the rubber washer. The old part has the same brass centre but it is level with the surface of the washer. This tiny difference is enough so that the valve will not close.


    It is not possible to adjust the length of the lower part of the conducting rod so I do not know what to do.


    Does anyone have any suggestions? I could replace the entire vapouriser assembly (part 115-500) but this seems ridiculous for the sake of a washer and anyway I would like to keep the lamp as original as possible.


    The picture shows the new part. The old part is back in the lamp because it still works (for now)


  • Hey Svenedin


    Welcome in the Pelam Forum!
    Where are you from?


    And where did you get your spare part from?


    You are right with the theory that the hight difference is the key for you leackage.
    Usually the new part should be level too at this place, like the old one.


    I can understand that you would like to keep you latern as original as possible.
    I always do that too, if possible on any way.


    There are a few differences between new and old parts.
    They won't fit sometimes.
    I'll make some pictures tomorrow, to illustrate the valve problem.


    I could offer you an old hexagonal valve, with a new rubber part fittet in.
    This is the original Petromax part from the 1960th and will fit your latern well.


    If you would like to replace the rubber by your own, let me know and i'll show you how.


    By the way:
    Very nice and detailed description. I really like that! Nice picture too! :done:


    Mein größtes Spielzeug:
    MAN KAT1 5t mil glw - 12,7 Liter V8 DIESEL

  • Thank you Jonas. I am from Surrey in the UK. I collect lamps and stoves. My paraffin lamps are Tilley X426Bs and ex-military Vapalux M320s. I have 4 Tilleys and 2 Vapalux. I also have 2 Petromax 500 HK and some Coleman petrol lamps. One Petromax is modern, the other one is the one this thread is about.


    I particularly like Petromax lamps though they are a bit complicated compared to the simplicity of my British lamps. However, they are also much brighter and more fun to fettle!


    I bought the spare part from Pelam.de. I would be glad to know how to fit a new rubber to my original part and also to have a spare if you would sell me one. I do have some Viton washers for other things that would be big enough to cut the rubber from.


    For now I found another valve in my parts box. This is the type with just a flat rubber top (no hollowed out brass cone). I have fitted this part and the lamp now runs well but I would prefer to fit the correct part and maybe have a spare too!


    The picture shows the part that fitted.


    Einmal editiert, zuletzt von Svenedin ()

  • Hi Svenedin,


    why don't you take a drill an bore the hole in the centre of part 193 a bit deeper.
    So that it's leveled to the surrounding rubber washer.


    Couldn't it be as simple as this?
    best regards
    willi

    Demut tät' uns allen gut.

  • Actually I did try to drill the hole a deeper but my attempt at modifying the part did not work and the valve still leaked.


    Here are some pictures of the original part from my lantern.


    The rubber does not look very worn in the pictures. It is not worn but it is perished because it has been sitting in a lamp for 50 years.

  • Hey Svenedin


    Now I have made some pictures of the valves.


    There are three different versions.
    The hexagonal with inside fitted spring is from the 60th and earlier.
    The middle one is new.
    The other hexagonal is from between.
    But thisone isn't good at all.
    The rod will always push onto the rubber and will deform it.
    Thats results in leaky valves after a while!


    The spring from the 60th and the new one is different.
    The old ones are slightly longer because the spring fits inside the valve body.
    Newer springs are shorter. They fit at the outside of the brass part.


    That's why it is sometimes not possibe to use new valves in Lamps with the longer springs.
    The result can be, that you can't turn your wheel to open the valve.
    The spring will be squeezed to much! If it is to tight, you can easily break the little pin from the excenter!


    If you want to replace the old valve, always use a new shorter spring too.
    Or cut down the old one a little bit.


    How to replace the old rubber part:


    You will need a small to medium size bunsen burner (not just a normal flame).
    Seperate the brass part from the spring.
    Place the valve on a fireproof undergrund and heat it up until the rubber burns away.
    Let the rubber burn out.
    Use a small flat screwdriver (or similar), to scratch out the rubber (breaks away easily now).
    Clean it well! If you can with a ultrasonic bath or a tool with a fine brass/steel brush (spark plug brush).
    Now grab your new valve and use small pliers to break away the thin brass border around the rubber part.
    Be careful not to damage the rubber part!
    Now use the exposed rubber part and fit it into the old cleaned valve.
    It should fit well, rubber is the same size as the old one.
    Now you got your refurbished valve and it is original as possible.


    I hope that helps?


    The pictures show all types of valves.
    Also you can notice the different lenth of the parts.


    The Springs:
    long = old (60th and older)
    short = newer


    fitted valves = correct spring mounted on ech valve
    other pictures = front/top/rear view of all types


    Pleasy PN me your adress and I'll send you a refurbished valve and a brand new one with the right (shorter) spring. ;)

  • Jonas, thank you very much for your help! I will PM you. I have also started a thread on the CPL forum. Other people are having the same problem and are annoyed with Pelam.

  • By following the kind and helpful advice from Jonas this problem has now been resolved. I swapped the rubber washer from a new part to the old part and the lamp is now working well. It was not necessary to burn out the old washer as it came out with a the aid of a needle.

  • Ok i forgot to write that the blowtorch is the last option (but goes fast ;) )
    You are absolutely right, as long as the rubber is not rock hard you can remove it with a needle.


    Nice that the latern works well now!! :thumbup:


    Mein größtes Spielzeug:
    MAN KAT1 5t mil glw - 12,7 Liter V8 DIESEL